Sunday Potlucks

Monday, May 21, 2007

Dumpling Wrapping Party!

It's been awhile since this blog was updated and I don't blame anyone for abandoning it... We've been having the potluck semi-regularly (Mid-year Thanksgiving was one, Sedar was another), but at least from my side, I haven't make anything super spectacular of note.

A few weeks ago, I thought I'd add a little ethnic twist and host a Chinese dumpling wrapping party. I have fond memories of growing up and wrapping dumplings for dinner every Wednesday night. Since then, my cousins and I have occasional dumpling wrapping get-togethers where we wrap hundreds of little dumplings and each consume more than our fair share, but haven't really shared this tradition with non-family.

As I'm the only regular ethnically Chinese member of the group, I decided it would be fun to introduce this fun activity with a larger group. We met at the local Asian food market and shopped for all the ingredients. I put together the filling and at around 5:30pm, the gang showed up at the door and rolled up their sleeves and started wrapping.... I showed them "ye olde family wrapping" method, but the guys got creative and we had some excellent "mohawk" wraps and "flying dutchman" wraps.

Of course everyone asked me for the filling recipe so here it is... enjoy! Except for the meat, all other ingredients are approximate. Add, delete or enhance based on preference. Whatever you do, they'll taste a THOUSAND times better than anything you buy at Costco!!! They also freeze beautifully.

Roasted Squid's Family Dumpling Recipe

1 lb ground pork
1 lb ground chicken or turkey
1 lb finely chopped shrimp (deveined and shelled)
3 or 4 finely chopped green onions
3 cloves finely minced garlic
5 dried and reconstituted Shitaki mushrooms, finely chopped
1 medium bunch of Chinese Chives, finely chopped (can also substitute 1/2 of a large Napa cabbage, finely chopped, salted, left to sit for 10 minutes, than sqeezed of excess moisture - personally that's too much work for me, so I prefer the chives when they are in season)
1 small bunch of cilantro
2 inch section of ginger, finely minced or grated
3-4 Tablespoons of soy sauce
1 T of kosher salt
1 T of corn starch

Mix everything together by hand, until thoroughly mixed. Let sit for a half or so to let flavors to meld. Wrap using favorite dumpling wrapper (at a $1 a package, much easier and more consistent than wrappers made by hand). Makes between 150 - 200 dumplings.

To freeze: Put raw dumplings on a cookie sheet covered with parchment paper. Make sure the dumplings are well seperated so they don't stick together. Stick in freezer for at least 2 hours or until completely frozen. Store in plastic freezer bags. These freeze GREAT and we always have some homemade ones in the fridge for quick and easy dinners.

To boil: Bring large pot of water to boil. Add 20- 25 dumplings (or as many as you want to cook - less is fine) to water. Wait for water to come to a boil again. Add a cup of cold water. Wait for the water to boil a second time. Drain water. Dumplings are ready to eat. Note that this technique also works for frozen dumplings.

To pan fry: Add about a couple tablespoons of oil to bottom of nonstick skillet and put on high. When oil is hot, add enough dumplings to cover bottom of skillet (or as many as you want to cook - less if fine). Note that to pan fry, it's important to wrap dumplings so that they stand up. Wait a couple of minutes until the bottoms start to crisp. Add enough cold water so that it goes half way up the dumplings. Be careful as the oil can splatter. Cover the skillet and wait until all the water has boiled away (about 10 minutes or so) - this steam-cooks the dumplings. Uncover the skillet, and let fry until bottom is as crunchy as you like it. For extra crispiness, you can add a teaspoon of corn starch in the cold water bath. Note that this technique also works for frozen dumplings.

Roasted Squid's Dumpling Dipping Sauce

2 parts soy sauce
1 part balsamic vinegar
A splash of Sesame Oil to taste
Finely chopped green onions to taste
Finely chopped cilantro to taste
And Chili-Garlic sauce for added spice, on the side

Note that this recipe isn't exactly traditional. When I was growing up, it was plain white vinegar and no green onions or cilantro. In other families, it's just plain soy sauce. But this is what was served last night. You can also add chopped garlic or whatever additional herbs you'd like.

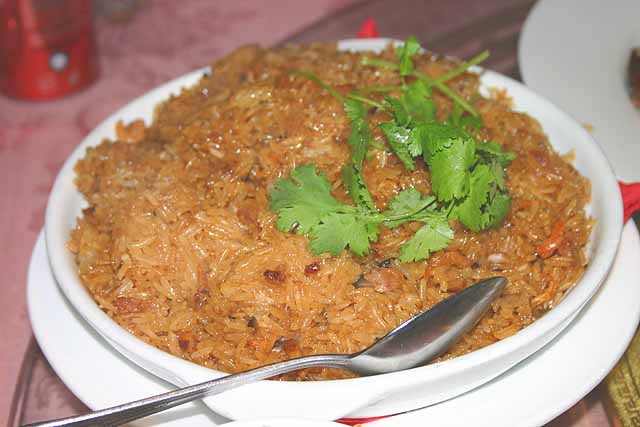
I also made Brown Sticky Rice, which I had made at a previous potluck. Recipe here.

Monday, March 12, 2007

Italian BBQ

The original theme for this weekend's potluck was "Viennese," however, in the last minute the theme changed to BBQ due to the unseasonably nice weather.

Problem was, I didn't get the email. It was so nice, I didn't bother checking it all weekend.

So I showed up to the grilled meat and watermelon menu with an assortment of crostini and tiramisu. Oh well!

As usual, I forgot to take pics, so you'll just have to imagine the deliciousness.

********
Crostini

This past September, the family and I trekked to Italy to attend a wedding in Tuscano....where we proceeded to eat like starved maniacs for two weeks. By far, the most memorable meal, was the five hour rehearsal dinner in a little L'Osteria in some tiny town in the middle of nowhere. We should have known we were in for a meal of a lifetime, when the waiters swooped down with not one, two, three, but what seemed like a dozen or so different kinds of crostini to begin the feast.

I was not so ambitious. I made three different toppings, and didn't even bother spreading the toppings on top of the crostini. Anyway, what I lacked in quantity was more than made it quality. As good as the food was in Tuscany, the bread SUCKED.

Crostini

Skinny Italian Bread or Baguette sliced at the diagonal
Olive Oil
Garlic

1/ Preheat oven to 350 degrees
2/ Smash garlic and put it in a bowl with about a half a cup of olive oil (depending on how much your making).
3/ Lay out bread on baking sheets
4/ Brush olive oil on slices of bread
5/ Toast to golden brown for about 10 to 15 minutes

Chicken Liver
In Heat, Bill Buford has the whole section about how BROWN Tuscan food is and I laughed my way through it because it was so true. Anyway, I borrowed this book from cousin, so no longer have it in my possession. Otherwise, I'd quote liberally. Even if you are not a foodie, I highly recommend the book. I made the liver topping in honor of Mr. Buford, so go read it! By the way, this recipe and the olive tapinade (slightly modified) comes from The New Basics Cookbook, which I bought in college 17 years ago (!!!) and have used regularly since.

EVOO
1 lb chicken liver
1 large onion
1/2 C chicken stock
1/2 C dry white wine
3 cloves garlic
2 t dried sage
2 t fresh rosemary
3 T capers
4 anchovy fillets
1 1/2 t tomato paste

1/ Heat oil in skillet over medium heat and saute onions until soft, then add the chicken livers and cook until browned.
2/ Add stock, wine, garlic, sage, rosemary, salt and pepper to taste. Cook, stirring frequently until liquid mostly reduced (at least by two-thirds)
3/ Add capers, anchovies, and tomato paste. Stir well and cook 1 more minute.
4/ Transfer mixture to food processor and puree until smooth. Remove pate to serving dish and refrigerate for at least 2 hours for flavors to meld.
5/ Let the liver come to room temperature at least 30 minutes before serving.

Olive Tapenade

3/4 C pitted Calamata olives
1 t minced garlic
1 T capers
1/4 C EVOO
1 T chopped Italian parsley

1/ Combine olives, garlice, and capers into food processor and process for a few seconds to combine.
2/ With the motor running, slowly drizzle olive oil through deed tube.
3/ Transfer mixture to bowl and stir in parsley

Peas, Mint, and Creme Fraiche
I know, not exactly Italian, but I needed a touch of green after all that brown. This recipe is completely made up, so I don't have exact measurements.

1/2 Bag Frozen Peas
Handful of fresh mint
1/4 C Creme Fraiche

1/ Boil Peas until just done, but not mushy. Drain and rinse in cold water. (I know your supposed to shock in ice water, but I'm lazy. So kill me.)
2/ Put peas, mint and creme fraiche in food processor and process until smooth
3/ Season to taste

**********************

Tiramisu

We didn't exactly eat Tiramisu the whole time we were in Italy, despite it's reputation as a "typical" Italian dessert. I have a feeling Tiramisu is akin to eggrolls, which are not quite Chinese. Still, we did have something similar to it in that memorable rehearsal dinner. However, they called it English pudding (!). Go figure.

There are A LOT of recipes online for Tiramisu (trust me, just google it). I ended up using a super simple one out of an international cookbook I bought for $5 out of the bargain bin at Barnes and Noble (please don't ask me how many cookbooks I have!). I liked it, because it was, most importantly, SIMPLE - no fancy custard required filtering through a fine mesh strainer (yeah right), no fancy booze I've got to make an extra trip to find and will never use again, and no fancy ingredients. And I liked the idea of adding the whipped egg whites as it added some lightness to the heavy custard.

3 eggs separated
2 C marscapone cheese
1 T vanilla
2 - 3 T sugar to taste
3/4 C cold, strong, black coffee
1/2 C Kahlua
enough lady fingers to create layers. (I used 1 and 1/2 packages of TJ's lady fingers, but that's because I used 3/4 package to create a pattern to line the inside edge of my trifle bowl, but in a standard 8x8x2-ish dish, one package is probably enough)
Sifted cocoa powder and grated bitterweet chocolate

1/ Whisk egg whites until stiff and in peaks
2/ Mix marscapone, vanilla, sugar (to taste), and egg yoks in a separate large bow and which with electric mixer until evenly combined.
3/ Fold in egg whites.
4/ Put a thin layer of custard at bottom of bowl
5/ Mix the coffee and liqueur in a shallow dish. Dip a ladyfinger in the mixture, turn it quickly so that it becomes saturated, and place it on top of the marscapone in the bowl. Dip and lay down enough ladyfingers to create an even layer.
6/ Spoon custard on top of the ladyfinger layer. Make more layers in the same way, ending with the marsarpone.
7/ Before serving, sprinkle with cocoa and grated chocolate (which I forgot).

Enjoy!

Sunday, February 25, 2007

Happy Chinese New Year's Oscar


These Sunday's potluck coincided with both Chinese New Year's and the Oscars, so I decided to bring some Taiwanese comfort food to watch the festivities.

Some years ago, my mom gave me cookbook full of homestyle Taiwanese recipes printed by The North American Taiwanese Women's Association, and since then it's been my home away from home bible. Too bad, it's out of print! Two of the recipes I make over and over again are personal favorites from my childhood... brown sticky rice (or Chinese risotto), and pickled cucumbers.
Some of the ingredients may seem somewhat exotic, but they are pretty much staples in an Asian kitchen... which my kitchen is not as Asian as it ought to be. Thankfully, an Asian grocery store just opened two minutes from our house (on Mission just past 280 in case you're a neighbor) and the place ROCKS. So head on over and check it out.

Sticky Rice
  • 2 cups long grain sweet rice (the most common brand you'll find at the Chinese grocery store is Koda Farms Sho-Chiku-Bai Premium Sweet Rice, sold in 5 lb bags)
  • 6 dried shitake mushrooms (found EVERYWHERE in Chinese cooking)
  • 10 chunks of ginger, smashed
  • 4 oz boneless pork, sliced into thin strips (e.g. pork butt or center cut pork chops, although tonight I used Tofu Jerky purchased at the Ferry Building yesterday)
  • 2 T sesame oil
  • 2 T vegetable oil
  • 4 T soy sauce
  • 1 1/4 cup hot water
1. Place long grain sweet rice in a large bowl and rinse thoroughly. Cover with water and soak for at least 4 hours. Drain.
2. Soak dried mushrooms in hot water for 10 minutes or until soft. Finely slice into thin pieces.
3. Crush ginger chunks with the side of a knife, or in a plastic bag with a rolling pin. The purpose is to release the flavor from the ginger.
4. Heat non-stick pan with sesame oil and vegetable oil. When oil is hot, brown crushed ginger. When browned, remove ginger from pan.
5. Brown pork (tofu) and mushrooms in remaining oil and thoroughly cooked.
6. Add sweet rice and soy sauce to pan. Mix all ingredients thoroughly.

COOK IN PAN OPTION
7. Add 1/2 cup of hot water, cover pan, and cook at high heat for 2 minutes.
8. Stir mixture and add remaining hot water. Keep stirring until the rice is cooked or becomes translucent.
9. Cover pan and cook at low heat for additional 10 minutes. Serve.

COOK IN RICE COOKER
7. Move sweet rice mixture into rice cooker.
8. Mix 1 1/2 cup of water with the rice mixture and cook according to rice cooker instructions.


Labels: , ,

Sunday, February 04, 2007

Baked Apples

The theme was comfort food and I had apples to spare, MZ recently having decided that it's not nearly as entertaining as she thought it was to eat them whole on her own.

So, gussied up baked apples, following Cook's Illustrated's technique but fiddling with the ingredients to suit my own dislike for the apples and cinnamon combination, and the need to avoid nuts if I want MZ to be able to have some.

8 small apples, one strip of peel from stem end removed, rinsed, dried, and cored from the stem end to just above the flower end (do not puncture the apple)
1/4 c golden raisins
1/4 c chopped dried figs
4 t unsalted butter, softened
1/2 c + 2 T maple syrup
1 c unfiltered apple cider, or enough to come 1/2 inch up side of the pan
1/2 cup marscapone cheese

Heat oven to 350 degrees. Place apples in Pyrex or ceramic baking pan so that the fit together closely enough to stand up. Combine the softened butter with the raisins and figs and fill the apples generously. Pour the 1/2 cup maple syrup over the apples, and pour the cider into the pan.

Bake the apples, basting every 15 minutes, until tender when pierced with thin, sharp knife or cake tester, 35 to 45 minutes. Do not overbake -- the skins will split.

Meanwhile, combine the remaining maple syrup with the marscapone. Remove the apples from the oven and allow to cool a bit. Top each apple with a dollop of the maple-marscapone mixture and serve, warm.

Monday, January 29, 2007

Glorious sprouts

I love Brussels Sprouts. I liked them as a kid, back when my mom boiled or steamed the hell out of those "tiny cabbages." I gained a mature appreciation of them shredded into leaves and braised in stock, or quartered and sauteed with bacon and shallots. And then about a month ago, when my sister was in town, I swooned over a dish we had at a nearby restaurant, Firefly. So for last night's Sunday Dinner (theme: Down-Home Cookin'), I made Glorious Sprouts:

- Clean, trim, and quarter about a pound of sprouts. If they're small, you can just half them.
- Toss with a glug of olive oil and some sea salt. Roast in a hot oven (450 or so) until some of the leaves are charred and the cut surfaces are golden, not white. Give it at least 30 minutes.
- Drizzle a tiny bit of white truffle oil on top, enough to haunt you with its smell.
- Shred some good parmesan on top of that.
- Try not to eat the whole bowl by yourself.

Labels:

The Zonderwick Potluck

So what seems like ages ago, we went to the Zonderwick home for Sunday Dinner. Pan-Asian fusion was the theme, and M did most of the cooking for our household. He's, um, a little tardy to the blog scene, so I'm filling in on his behalf.

We decided to make 2 dishes: coconut rice and Sichuan green beans. The coconut rice recipe is from a cookbook on Thai cuisine, sort of. For Christmas 2003 he bought me this big, gorgeous tome on Thai cooking (by David Thompson), a historical and culinary epic. We're talking 600+ pages. The other half of the gift was cooking classes, but one thing led to another, baby on the way, weird changes to the palate, can't deal with spicy food ... my taste buds have recovered from pregnancy hormones, but haven't made time for the classes just yet.

And that cookbook? Food pron of the worst kind. Gorgeous pictures, long ingredient lists (with metric quantities, no less!), irrational instructions, and a lousy index. If you look for coconut rice in the index, it's not there. But if you carefully read the chapter on "Street Food" it's in there, nestled in between practical recipes like "Stir-fried water mimosa with minced pork and peanuts" and "fermented pork sausages."

Anyway, here's the modified recipe (served 6-8 as a side dish):
- soak 2 cups jasmine rice in water for 2 hours. Drain and place in a saucepan.
- In a bowl, mix 2 cups coconut cream (or coconut milk if you can't find coconut cream) and 1 cup water. Add a pinch of salt and a tbsp sugar (palm sugar if available), and 2 knotted pandanus leaves if you can find them (we couldn't). Mix well, then add to rice and boil. Simmer over low heat 15 min.
- Remove rice from the heat and stir well. Let rest 5 min. Place in a serving dish, then sprinkle a handful of fried shallots on top (or cheat and use the fried onion bits from Trader Joe's, which are lovely).

The Sichuan Green Beans are a stellar recipe from a recent issue of Cook's Illustrated, again modified slightly:
This recipe ostensibly serves 4, but it is so tasty that you may want to double it in 2 batches.
Don't be tempted by jarred garlic and ginger for this recipe. Fresh flavorings make a huge difference.
- Make sauce with 2 tbsp soy, 1 tbsp dry sherry, 1 tsp sugar, 1/2 tsp cornstarch, 1/4 tsp ground white pepper, 1/4 tsp red pepper flakes, 1/4 tsp dry mustard, 2 tbsp water. Set aside.
- Prep and set in dishes - 1 # green beans in 2-inch pieces, 3 pressed fresh garlic cloves, 1 tbsp minced fresh ginger, 3 thinly sliced scallions.
- Heat 2 tbsp vegetable oil in a large skillet over high heat. Add beans and cook until they are slightly blackened, stirring with tongs, about 5-8 minutes. Remove from heat.
- Add 3/4# ground pork to skillet and cook through, stirring to break up chunks, 2 min. (For vegetarians, substitute minced shiitake mushrooms cooked in a little oil). Add garlic and ginger and heat until fragrant. Whisk sauce to resuspend corn starch and add in, then stir in beans and coat with sauce, 5-10 seconds. Spoon into a bowl, top with scallions and a dash of toasted sesame oil, then serve.

Enjoy!

Labels: , ,

Monday, December 18, 2006

A-lo-ha

Thanks to Mason's fertile imagination, this past potluck's theme was Christmas in Hawaii. You know... Spam, Elvis, the works. We finally got a chance to host, so we padded the guestlist with our friends, and decorated the house tiki-style!!!

Thanks to a friend at work, I managed to scrounge up two GEN-U-INE Hawaiian recipes, Kalua Pork and Lomi-lomi. Both were delicious and the pork embarrassingly easy to make.

***********************************************


Lomi-Lomi (Salmon Salad)

Ingredients:
1.5 lb salmon filet(s)
about 3 tbsp of Hawaiian Salt (coarse salt - do NOT use table salt)
9 large tomatoes, diced
1 large sweet or Hawaiian onion, diced
1 bunch of green onions, chopped

Non-traditional Ingredients:
1-2 Jalapenos, seeded and chopped in small pieces
Juice of 1-2 limes

1. 3 days before event, liberally sprinkle Hawaiian Salt on both sides of salmon filets and place filets in one layer in a baking dish.
2. Add enough water to baking dish to that the water is a few millimeters deep (so not much). The water is to help the salmon soak in the salt. Put in fridge.
3. After one day, flip salmon filets so the other side is in the water. Put back in fridge.
4. The night before event, rinse out salmon filets thoroughly in fresh water. Taste Salmon as you rinse to make sure it's not too salty.
5. Dice salmon and add diced sweet onion, chopped green onion, jalapenos.
6. The day of the event, add the diced tomatoes, and lime juice to taste
7. Traditionally, ice is added to the salmon to keep it cold, but it seems kind of wierd to me, so I kept the final dish in the fridge until ready to serve!

***********************************************

Kalua Pork

Ingredients:
3-5 lb Pork Roast
2-3 Tbsp Hawaiian Salt (coarse salt - do NOT use table salt)
2-3 Tbsp Liquid Smoke
Banana leaves (optional)

1. 2 -3 nights before event, liberally salt pork roast.
2. Add liquid smoke, make sure to cover all nooks and crannies
3. Wrap pork in plastic and store in fridge
4. Day of event, preheat oven to 350 degrees (325 for convection ovens)
5. Cover roast in banana leaves (optional - I didn't because I didn't have time to hunt it down at an asian market).
6. Wrap roast tightly in aluminum foil.
7. Place roast in a roasting dish. Add a cup of hot water to bottom of roasting dish.
8. Cover ENTIRE roasting tightly in aluminum foil. Water will steam the pork.
9. Bake pork roast 1 hour for every pound
10. After baking, let roast rest covered at least 15 -20 minutes
11. Unwrap, put pork in another dish and shred with two forks.

MAKES EXCELLENT SANDWICHES!!!

Labels: ,

Sunday, November 19, 2006

India Night - Chicken with Ajwain in Makhani Gravy & Potatoes with Kadhai Spices


Tonight was India night...it about time we tried a theme based on a country outside the Western Hemisphere! The only think about India food is that it takes time!!! Things stew for something close to eternity- perfect for the crock pot, but unfortunately I was not that organized today. There was nothing in the kitchen as I got back from Japan yesterday and we didn't have time to go shopping until the afternoon. But, by putting on my Rachel Ray hat, I was able to tweak some recipes that I got from an Indian cooking class that I took a few years ago, in order to speed up the process. The taste may not be completely authentic, but everyone ate it up just the same!

In addition to the liberties I took to shorten the cooking and prep time, I reduced the spice level to make it kiddie friendly and eliminated certain spices all together because they weren't available at the normal grocery store and I did not have time to make it to the Indian one. I'll try to note the major deltas in the recipe, in case you want to try the "real deal" one day but I'm typing in what I actually brought to the potluck since you all know what that tastes like. The deltas are marked in parentheses and italics below.

First of all, both recipes called for garlic and ginger paste. Traditionally both are made by mortar and pestle and in India that use a special high speed food processor that make quick work of it. Unfortunately I was stuck with an ordinary food processor and no time to make a paste from scratch. So instead I stuck a good sized chunk of ginger (at least 6 inches long) in a mini food processor with some light olive oil and water to make something like a paste (more like a fine mince) and did the same for the garlic. Not exactly the real thing... I think a paste tastes more gingery and garlicy, but the real deal is a real pain in the you know what.

********
Note that Makha means butter in Hindi, and even though I didn't have all the ingredients, how could you go wrong with a sauce made with butter and cream?? Note how empty the dish is below! People were practically licking the bowl.


Chicken with Ajwain in Makhani Gravy

Makhani Gravy

  • 1 28 oz can of diced tomatoes (2 1/4 lb ripe tomatoes chopped -- yeah right)
  • 2 tsp fresh "ginger paste"
  • 2 tsp fresh "garlic paste"
  • 2 jalapeno peppers, seeded and minced (6 serrano chilies)
  • 1 tspn paprika (red chili powder - the paprika adds color & some flavor without the heat)
  • 5 whole cloves
  • 4 green cardamom pods (mine were old, so the real deal is more cardamom-y)
  • 3 tspn butter (6 oz butter!!)
  • 2/3 cup heavy cream
  • 3 tspn honey
  • 1 tbsp julienned fresh ginger
  • (2 1/2 tsp kasoori methi or dried fenugreek leaves- not available in local grocery store but adds a pungent depth to Indian dishes)
  1. Place the tomatoes in a saucepan and add the ginger/garlic pastes, the jalapeno, the spices and salt. Bring to boil and reduce to the consistency of thick paste.
  2. (Force through strainer into a clean saucepan and return to heat - step eliminated for obvious reasons.)
  3. Lower the heat then stir/whisk in the butter. When fully incorporated in sauce, add cream and stir.
  4. If the gravy is sour, add honey, a teaspoon at a time until you have a well balanced sauce.
  5. Stir in the julienned ginger (and the kasoori methi).

The Chicken with Adjwain

  • 1 lb cubed chicken breast (original called for 2 1/4 lb medium shrimp but at $18/lb I made executive decision to change recipe to chicken).
  • 3 tbsp canola oil (4 tbsp ghee - too much trouble to make, but would have definitely tasted richer with ghee instead of oil)
  • 2 tbsn ajwain (a seed that tastes like oregano, and I miraculously happened to have on hand as I like to use it in chili)
  • 1/2 large onion, chopped
  • 2 jalapeno (4 serrano chili)
  • 1 tbsp "ginger paste"
  • 1 tbsp "garlic paste"
  • 1 tsp paprika (1 tsp red chili powder)
  • Makhani Gravy above
  • (1/3 C chopped cilantro - oops forgot to buy at grocery store)
  • (1 tsp garam masala - didn't have time to make from scratch and forgot to buy at grocery store. Would have tasted must better with it)
  • (2 tbsps lemon juice - only if you make the version with shrimp)
  1. Heat the oil in a large skillet and add the ajwain.
  2. When the ajwain starts to sputter, add the onion, ginger, garlic, jalapenos, and salt and saute for about 3 minutes.
  3. Add the chicken & chili/paprika powder and stir fry until chicken is done cooking - about 5 - 8 minutes depending on size of cubes
  4. Add the makhani gravy and deglaze skillet, coating the chicken.
  5. Stir in garam masala and cilantro... dish definitely would have tasted better with those in it. Oh well!

*****************

A Kadhai is a wok-like cooking utensil with circular handles on either side, used for frying, tempering and cooking vegetable dishes. They are often used by Indian food stalls and are associated with a certain type of flavor/cooking style (at least according to my teacher). The list of ingredients is long, but the actual dish is quite easy to put together.

Sauteed Potatoes with Kadhai Spices

  • 7 medium gold potatoes sliced thinly into rounds (new potatoes work, too. You can use any small to medium potatoes with thin skins that cook relatively quickly)
  • 2 medium yellow onions, halved and sliced thinly into moons
  • 2 jalapenos
  • 1 tsp "garlic paste"
  • 1 tsp "ginger paste"
  • 1/2 tsp cumin seeds
  • 1/2 tsp mustard seeds
  • 1/2 tsp fennel seeds
  • 1/2 tsp kalonji seeds (black onion seeds)
  • 1/2 tsp fenugreek seeds
  • 1/2 tsp crushed red pepper (more if you like it more spicy)
  • 5 curry leaves - usually you need to ask for it behind the counter at most Indian grocery stores --I didn't have time to get any.. but they definitely add a lot of flavor! Worthwhile to get if you have the time.
  • 1 tbsp fresh chopped cilantro - oops, forgot to buy some
  • 3 tbsps canola oil
  1. Heat the oil in a large skillet/wok/kadhai
  2. Lower the heat slightly and add cumin and mustard seeds. Cover skillet immediately with lid as these will pop!! If not popping, oil is not hot enough. Watch carefully as they are easy to burn.
  3. When done sputtering, throw in the rest of the spices, (curry leaves,) ginger and garlic.
  4. Stir-fry for a minute, and then add the sliced onions and salt, then saute until onions turn golden brown.
  5. Add the potatoes, cilantro, jalapenos and toss well.
  6. Cover skillet tightly with lid (very important!) and cook over low heat until the potatoes are tender, about 15 -20 minutes. You'd think there isn't enough fluid for this to work, but the residual moistness from the onions is enough to steam the potatoes. Trust me!